This is part two of a two part series: Faithlife 101. To see the first part, go to Faithlife 101: Part I
In our last post on Faithlife, we covered the basics. This post will guide you through setting up a group and controlling all of the options available to you as a group leader or admin.
Faithlife is a very powerful tool integrated with Verbum. If you haven’t already joined or created a group, try it out today! You can start by joining our Year of Faith group or the Verbum group, or even create your own and invite others to join. If you have a great idea for a new group, feel free to use the comment section below as a free promo platform for whatever group you’d like to get off the ground.
Let’s look at some ways to set up your own group and tailor it to best suit your members’ needs.
Start your own group
Starting your own group gives you full control over the various features of Faithlife. You can add widgets, create calendar events, link affiliate groups and more.
Step 1: create a group
Start by selecting either “New group” or “New event” in your browser’s top right corner. Let’s look at the more limited “New event” option first:

Events:
Faithlife events are built around a one-time event rather than a persistent group. This option is limited in that there is no section for Community Notes, documents, sidebar widgets, or the calendar. Faithlife events are geared toward making people aware of events and giving them basic information about where and when they’re occurring.
Click “New event” to get started.
You’ll first notice that next to every option there is a little green question mark. If you ever need help understanding one of the fields, simply hover over this “?” icon.

Let’s take a look at each of the options and how they function:
Event type
The event type has a number of different preset options, ranging from baby showers to retreat workshops. Choose the event that best describes the kind of even you’re hosting!
Event name
Name your event here.
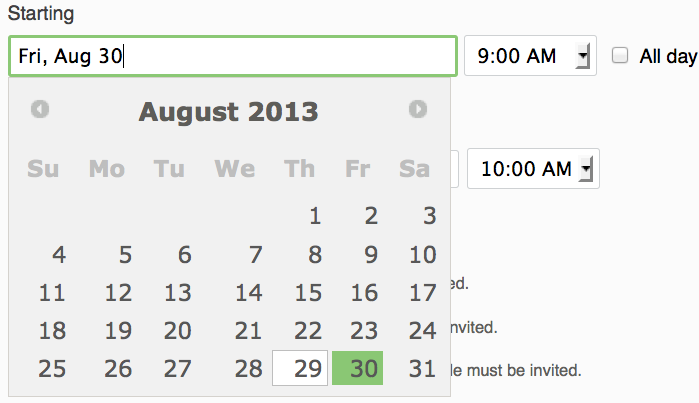
Starting and ending dates:
Here you’ll decide the dates of your event. You can click inside either date field to open up a calendar to select your dates.
Privacy Level
You can choose for your event to be public, private, or secret:
- Open groups are listed in search results, and allow members to join immediately without approval. Use this for public groups such as churches, organizations, or “fan pages” for authors, bands, ministries etc.
- Closed groups are listed in search results, but new members must be approved by you. Use this for churches, youth groups, Bible study groups, classes, or moderated discussion groups.
- Secret groups are hidden from non-members. New members must be invited to the group by the administrator. Use this for prayer groups, family groups, or any other private group.
Step 2: add some details
Location:
Enter where the event will take place. If you want to show a map and directions, enter a specific address, such as “1313 Commercial Street, Bellingham, WA.” If you don’t need a map, enter something your attendees will understand, such as “Bob & Tina’s House,” or “Parish hall.”
Phone:
Enter the phone number for the host or other key contact person for the event.
Email:
Enter the email address for the host or other key contact person for the event.
Group affiliations:
List any Faithlife groups that are affiliated with the event. For example, if several parishes put on a charity event, list all of them here.
When you affiliate an event with a group you are also a member of, the event will be listed on that group’s calendar automatically. When you affiliate an event with a group you are not a member of, the event is not added to that group’s calendar.
Affiliating a group to an event does not automatically invite the members of that group to the event.
About:
Write a short sentence or motto that describes what the event is about.
Description:
Write a complete description of the event for the event’s “About” page.
Step 3: invite people
Once you’ve filled in all the information about the event, it’s time to start getting the word out! There are three ways to start looking for people to invite:
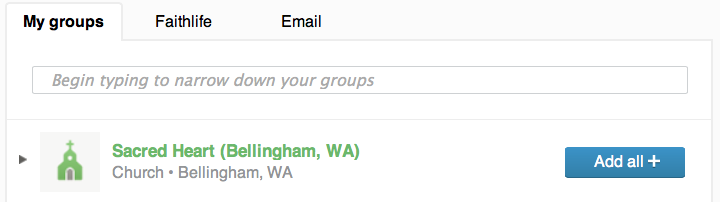
1) Start in the “My groups” tab. Here, you can add anybody who is already in the same groups as you. You can add certain individuals, or invite the entire group.
2) In the “Faithlife” tab, you can search for individuals or groups that you may not have already joined.
3) The “Email” tab allows you contact and invite someone via email, even if they don’t already have a Faithlife account.
After you’ve invited your members, your event is all ready to go!
Groups:
Groups allow much more control and versatility than an event in Faithlife. In groups, you can make and read Community Notes, documents, sidebar widgets, or calendar events. Start by clicking “New group” and fill in the basic information. Next, you’ll want to fill out your user permissions.
User permissions
Customize your group to best suit your needs. User permissions lets you determine who can see, write, and interact with the group. For example, if you started a study group and you don’t want students posting documents, you’ll want to modify the documents permissions so that members can’t share them. Let’s run through these permissions briefly and see how they work.
You’ll notice that there are five levels of permissions: admins, moderators, members, followers, and observers.
You are the group’s admin. Set the sliders to grant rights to others:
- Moderators maintain and manage the group, like deacons. Moderators must first be members, and they must be appointed by admins.
- Members are part of the group. In “Open” groups, members join without approval. In “Closed” groups, members can be invited or must have their request to join approved by an admin or moderator. In “Secret” groups, members must be invited.
- Followers are interested people who can read group posts without becoming members.
- Observers are like followers, but they’re anonymous.
Change the permissions to make your group function in different ways. So, for example, if you’re running an exclusive small group where the discussion is open to observers but you don’t want those observers to be able to see when you host certain events, simply change the calendar permissions so that observers can’t view the calendar.

If you have any questions about how permissions work, leave a question in the comments.
After you’ve set your permissions, you can edit them any time in the “Group settings” to the right of your news feed.
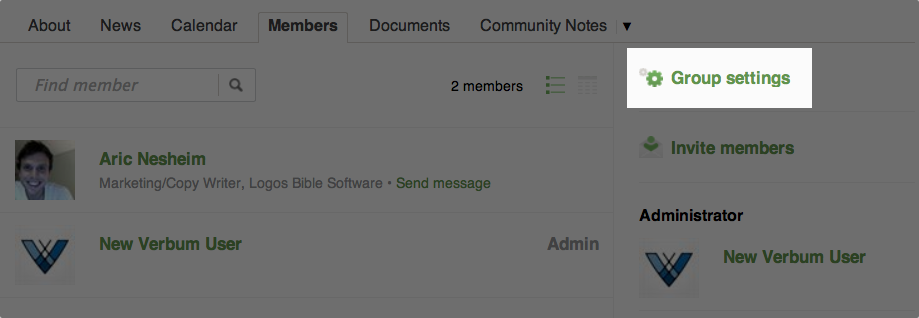
When you’re finished setting up your group, you can begin to customize the layout. Click on the “Group settings” button (shown above).
There are two tabs in the group settings menu: “Group details” and “Sidebar.” In “Group Details,” you can change the name of your group, its location, its description, and more. Clicking on the “Sidebar” tab allows you to see and organize what kind of widgets you have in your group’s sidebar.
Let’s take a look at what each of these widgets does.
Group widgets:
These widgets help you organize and build your group over time. Adding a widget is simple: just drag and drop the widget you want into the “Active” pane and you’re ready to go. Here’s how the widgets work and what they do:
Calendar:
The calendar widget allows the users in your group to view a calendar with all of your group’s activities and events right in the sidebar. Users can read through your posts and quickly see upcoming events.
Group readings:
The group readings widget shows all your reading plan selections scheduled for the day. This way, all members can see what books or studies you’re reading and what chapter or verses they need to read for the day. You can start a default reading plan right in Faithlife, or create a custom one in Verbum and then share it with whatever group you like.
Community Notes:
This section displays any Community Notes made inside your group in a feed, featuring the most recent notes at the top.
Contact info:
This feature simply lists your contact information for everyone to see—a helpful sidebar to have, especially if you have a lot of newcomers to your group.
Group prayers:
The group prayers widget lists any of your group’s prayer requests right in the sidebar. Listing all your prayer items for the day, you can check off the items to help you keep track of your intentions.
Verse of the Day:
The Verse of the Day feature is a simple widget that gives you a newly selected verse each day.
Media widgets:
The media widgets help you integrate various social media and networking tools right into your sidebar. Add as many social widgets as you like. Here’s what you can do:
Recommended links:
Recommended links lets you show a list of links to your favorite websites in the sidebar. You can add an unlimited number of links.
RSS feed:
The RSS feed widget allows you to show the last three entries from any given RSS feed. This feature is helpful for anyone who wants to link their Faithlife group to an external blog or news source.
Survey:
Set up a quick survey and let your group members provide input on any question you want to ask. You can add any number of answer options and get feedback instantly.
Twitter:
The Twitter widget lets you link any Twitter account right to your Faithlife group.
If you want to see what a widget will look like when you make it active, there’s already a built-in live preview feature to make sure the widget is exactly want you want.
Engage others around you!
And encourage others to do so as well! Faithlife is a powerful way to engage the different communities around you all around a study, text, or group topic you want explore. Start a Faithlife group today to begin studying with others!


Posted a link to parts 1 and 2 to the forum on Faithlife.